
Earlier this week whilst scrolling on Mastodon I came across this post:
This immediately got my attention for a few reasons:
- Swift was only released in 2014, the same year as the "new" Nintendo 3DS line. It did not exist (publicly) when the GameBoy Advance was released in 2001, nor any of its successors up until the new 3DS and Switch.
- I have the tools needed to try and compile this and run it in an emulator.
- I have the tools needed to try and compile this and run it on real Nintendo hardware!
Now, to be clear, I don't have a GameBoy Advance, as tempting as they are every now and again on Facebook Marketplace. But what I do have, which I have used for my journey to bring Pokémon from the 2002 games all the way into modern Switch games, is an original Nintendo DS.
Unlike the DSi and the 3DS, the original DS series had two game cartridges - one at the top for DS games, and one at the bottom for GameBoy Advance games.
And I also happen to have an EZ-FLASH Omega Definitive Edition which I got from Retro Gaming Parts here in Australia, which lets you load up multiple ROMs onto a microSD card, and even mimic one entirely which is necessary for Pal Park.
(Also, just as an aside, it kind of hurts to be buying things from a retro gaming store. That's a great way to make me feel old.)
So if I combine all of this I should be able to run Swift code in GameBoy Advance mode on a Nintendo DS. Let's put this all together:
- Get the code. This was fairly straightforward:
$ git clone git@github.com:finnvoor/swift-gameboy-examples.git- Read the README. This instructed that I need the latest Swift nightly toolchain, as well as a GameBoy Advance toolkit for LLVM.
- Download the Swift nightly toolchain and run the installer.
- Download the GBA LLVM toolkit DMG, mount the DMG, and copy the files somewhere else.
- Set up an environment variable for the GBA LLVM toolkit:
$ export GBA_LLVM=~/Developer/Scratch/gba-swift/gba-llvm-devkit-1-Darwin-arm64- Set up an environment variable for the Swift toolchain. Looking over the
Makefilethis seems like it should have been automatically detected, but for me it wasn't:
$ export TOOLCHAIN=/Library/Developer/Toolchains/swift-latest.xctoolchain- Run
make
$ make- Watch the build fail as Apple get really antsy about running un-notarised binaries from the GBA-LLVM toolkit.
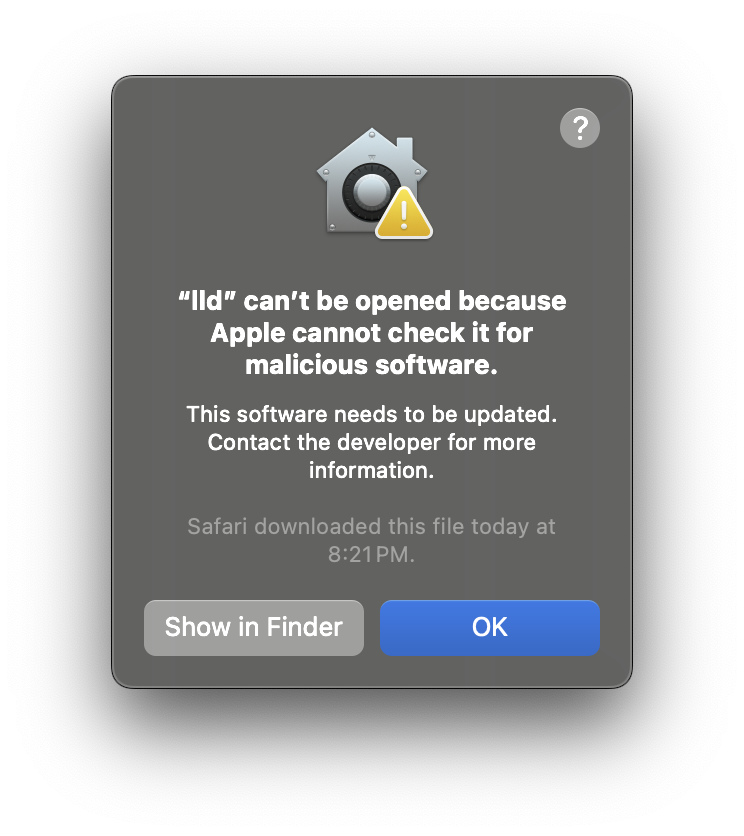
Every time that this came up I had to click on 'Show in Finder', right-click on that executable, select 'Open,' tell macOS that yes I really do want to open it, then watch it start up and immediately exit because it was launched with no command-line arguments. Still, that is enough to let macOS launch it from make on subsequent attempts.
- Loop between steps 7 and 8 above until
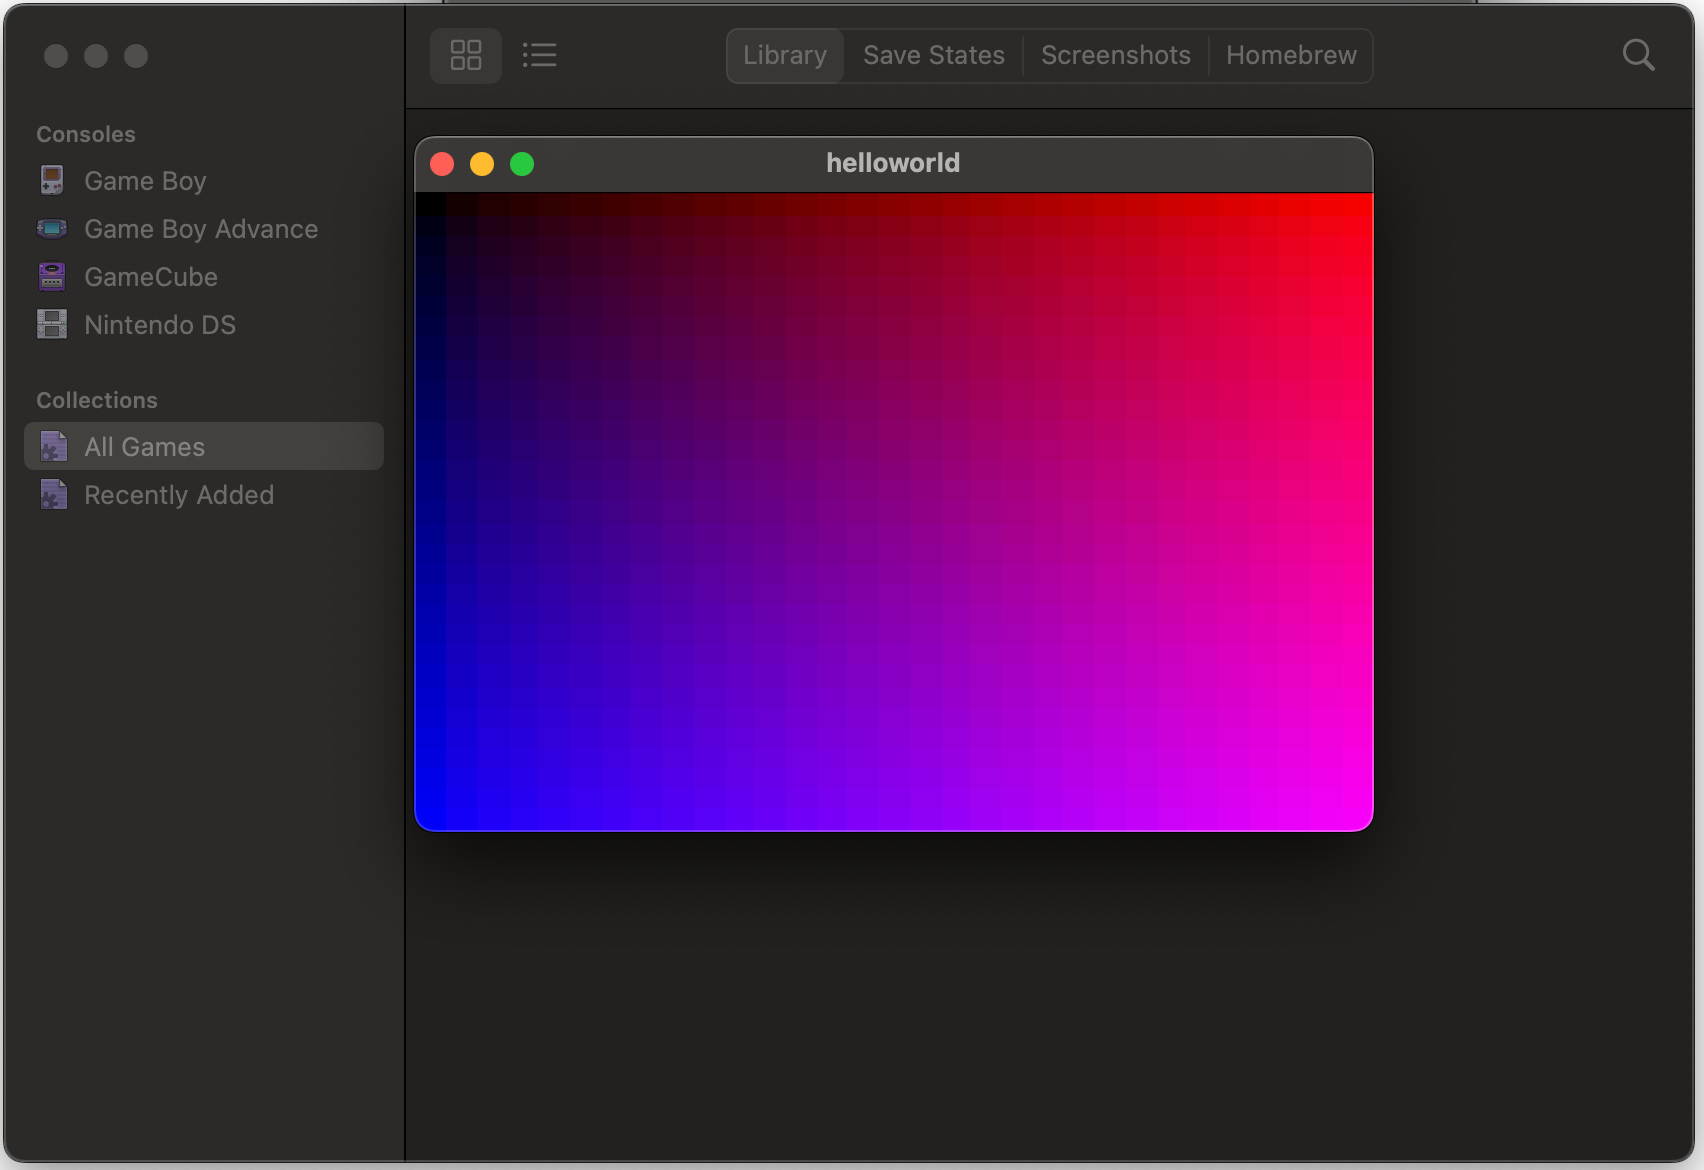
makesucceeds, and produceshello world.gba - To check that it works before dealing with hardware, drag
helloworld.gbainto your favourite emulator. I used OpenEMU.
- Now on to the hardware side. First, find your Nintendo DS and EZ-FLASH cartridge.
- Make sure that the switch on the EZ-FLASH cartridge is in the "A" position so that it boots into its own firmware and menu, not into whatever ROM was saved to its NORFLASH memory.
- Pop out the microSD card from the cartridge and insert it into your computer, adapter, etc.
- Copy
helloworld.gbaonto the microSD card. - Put the microSD card back into the cartridge.
- Put the cartridge into Slot 2 (the bottom GameBoy Advance slot) of the Nintendo DS.
- Turn on the Nintendo DS.
- Select "GBA Game" from the DS system main menu.
- Locate
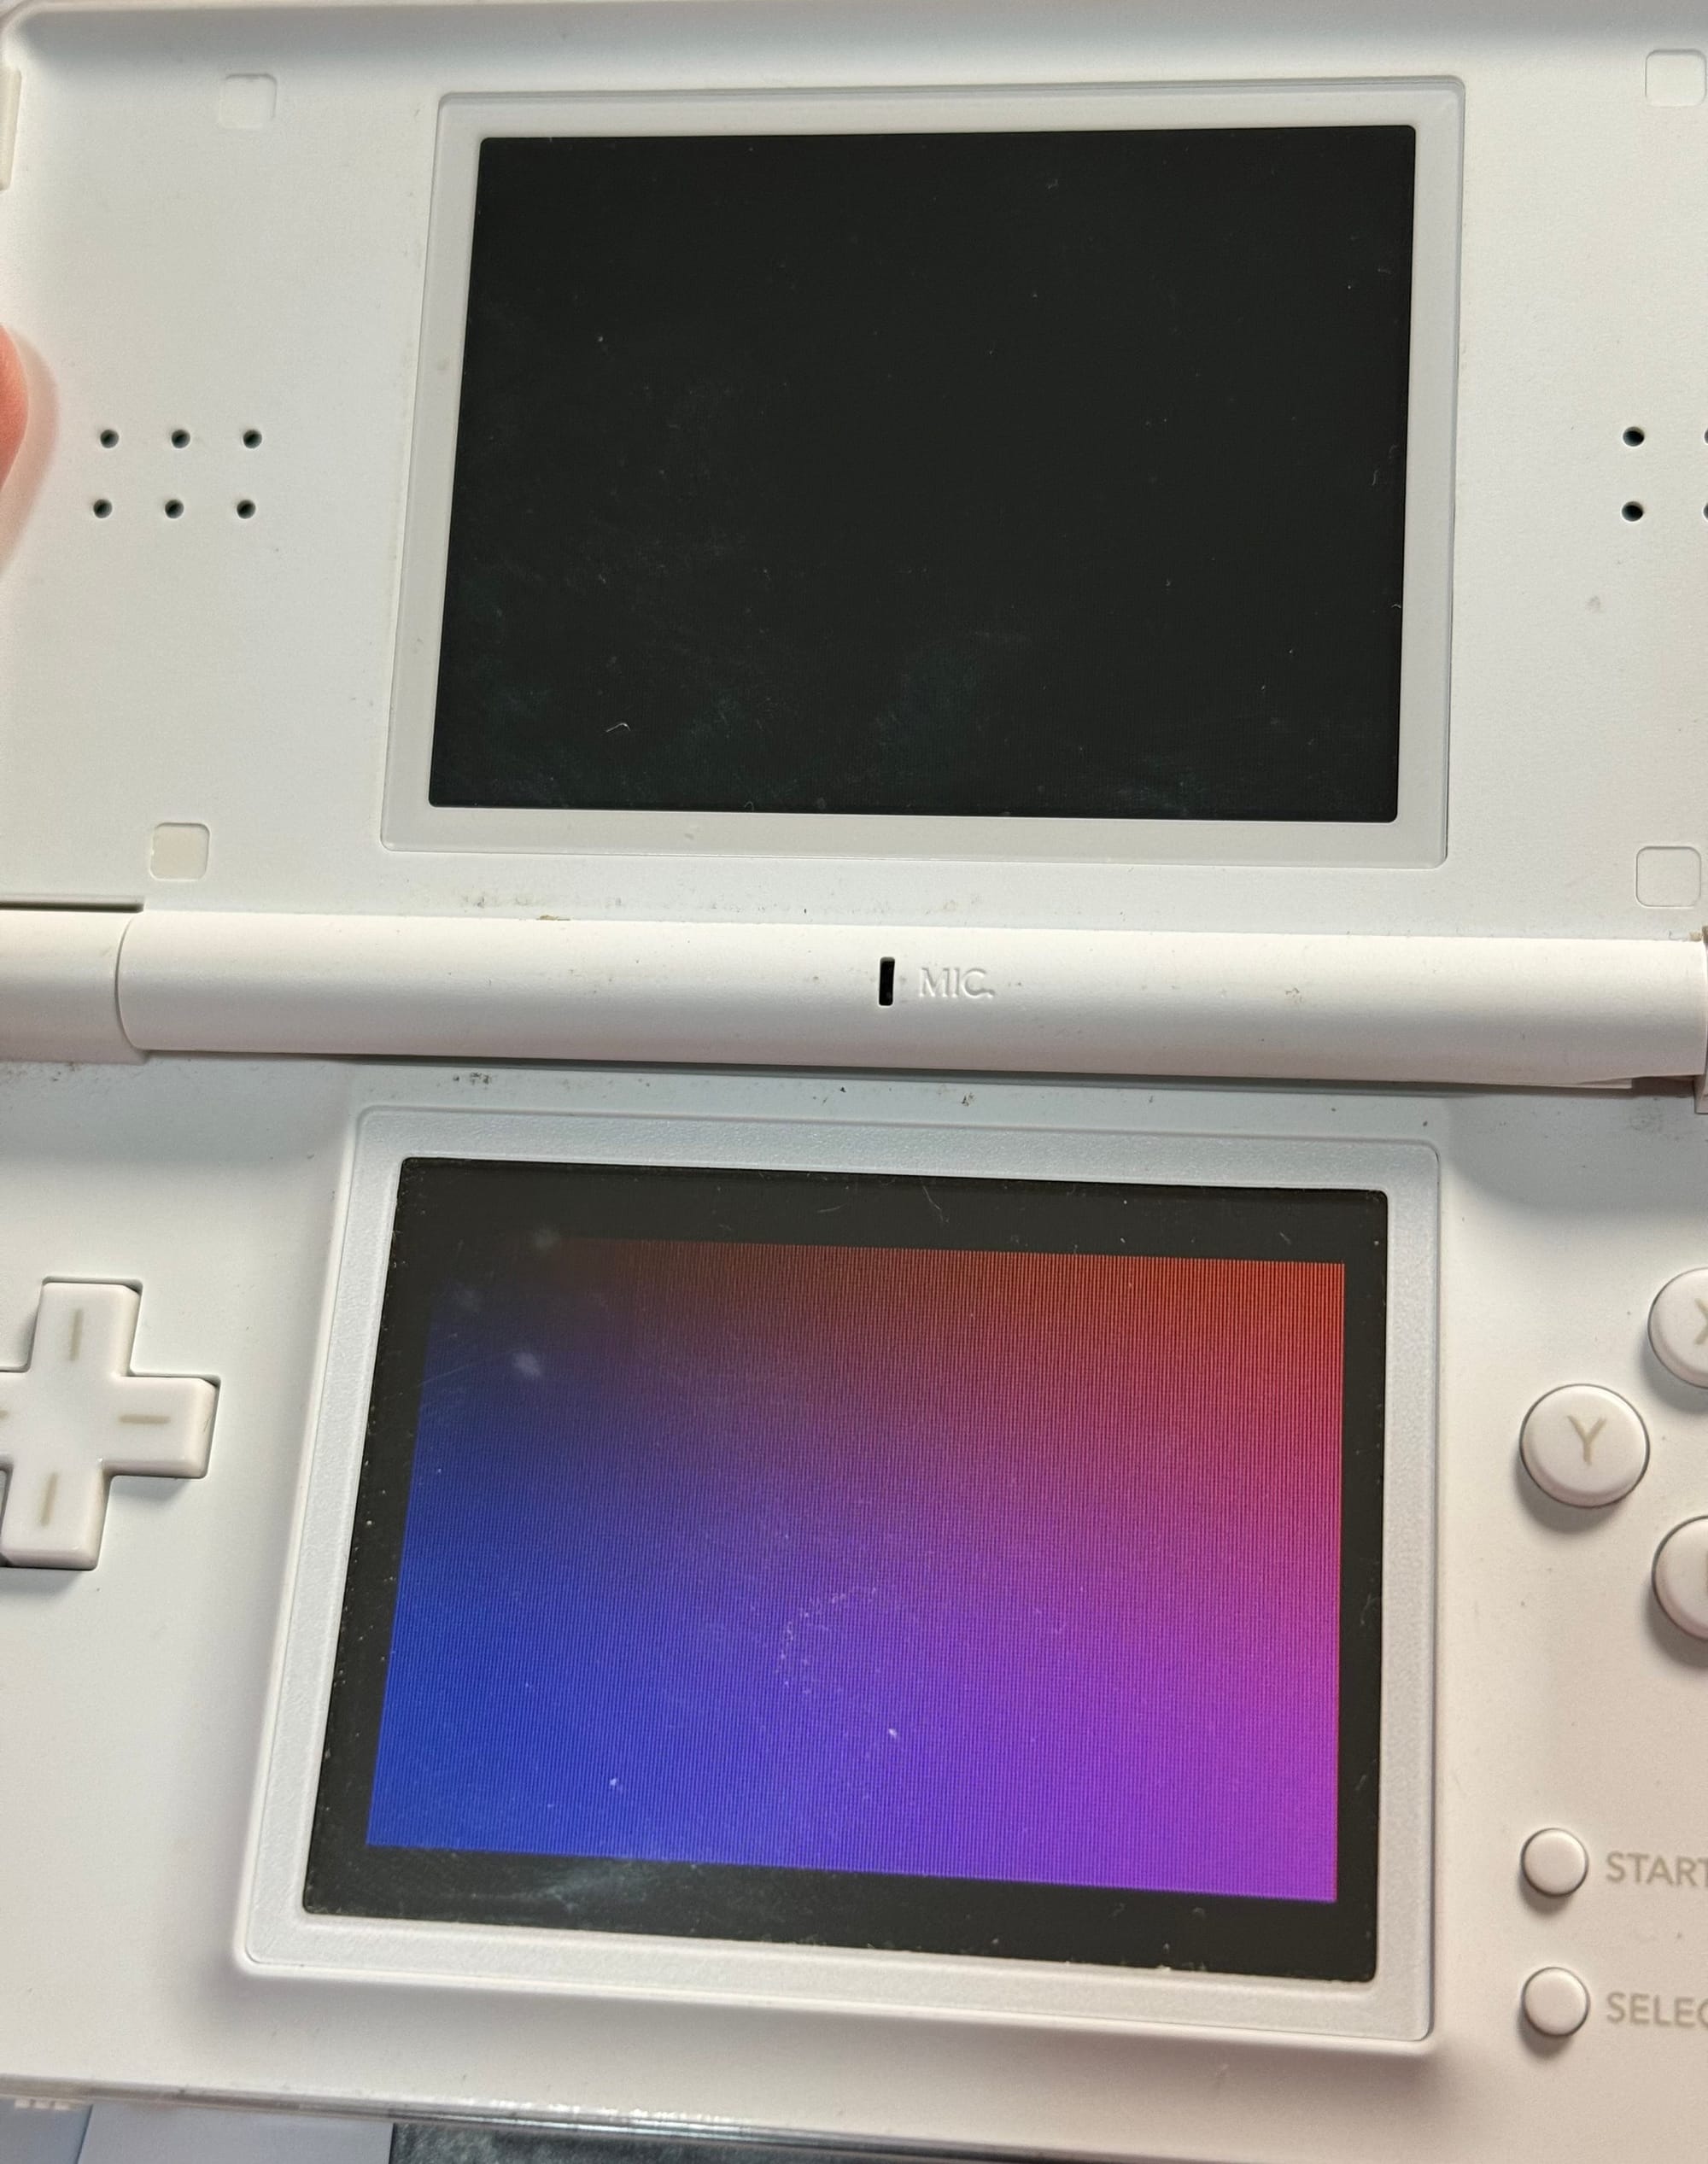
helloworld.gbain the filesystem menu from the EZ-FLASH and press A to launch it - Observe the Swift code rendering a gradient on official Nintendo hardware.
- Post about it to social media and celebrate.
